Tuesday, June 25, 2013

Tuesday Link Party #25

Welcome to If It's Not Baroque Tuesday link Party.  I am still trying to come up with a name for the party.  Hopefully, I can figure something out by the next party.  

Can you believe this is my 25th party already.  I can't believe it.  It is so much fun to host it every week.  I look forward to seeing each and every project.

In case you missed it, this is what I have been up to since the last party.


I explained how I painted my ceramic tile floor in our entry.


Now let's party!


Some party rules:

*Please follow If It's Not Baroque via Google Friend Connect, Email, or Blog Lovin. 

*Please link to a specific post not just your blog
(Anything goes - home decor, recipes, crafts, etc. that were made by you)

*Link up as many projects as you want, old or new.  As long as you haven't linked it here before.

*Please do not link up giveaways, Etsy shops or other link parties.

*Please, please, please put a link back to my blog.  I am helping you get more exposure, please help me get some exposure. 
(use the button above or a text link)

*Please visit some of the other links 

Every week, I will pick a few of the links that I like the most and will feature them the day before the next party.

Link Party #24 Features

Hello again.  Sorry I missed my scheduled post on Saturday.  We temporarily moved in with my parents to do our living room floor.  Saturday was busy packing and getting everything ready to go.  I simply ran out of time to blog.  

Yesterday, we finally ripped up that ugly green carpet.  I am so glad it is gone.  We are pretty busy again today installing things before we get to priming the floor.  Before I get back to work, here are my favorites from last week's link party.

Washi Tape wall pattern that looks like wallpaper
Washi Tape Wall Pattern by Callie's Crafts

A Vintage Nursery {rainonatinroof.com} #vintage #nursery #baby #girl
Vintage Nursery by Rain on a Tin Roof

diy coffee filter light
DIY Coffee Filter Chandelier by Two Zero One

The Gray Dresser Makeover by Girl in the Garage.  This was someone's ugly broken trash before it was repaired and painted- what a beauty now!
Dresser Makeover by Girl in the Garage

Lilly Pulitzer Inspired Cocktail Cart by Southern State of Mind

If you have been featured, please grab my button. (You can find the button code in the tab above).


I will be pinning the features on my Pinterest page as well.

Thank you to everyone who linked up.  I hope you will come back later today for another link party.

Thursday, June 20, 2013

How I Painted A Ceramic Tile Entry Floor

Today, I am going to explain how I painted the ceramic tile floor in our entry.  I must first apologize for the pictures.  Because the entry is so small it was really hard to get a decent picture of the floor during the whole process.

Let's go back to the before picture so that you can see what the floor looked like before.  


It was a pinkish tan color tile with a lot of texture.  The grout is stained and dirty even though I tried cleaning it several times.  I really didn't like the color and yes that is spilled paint on the floor.  All the more reason to paint it.

I have seen other bloggers paint just about anything so I thought that this was doable as well.  I gave it a whirl because it couldn't look worse.

Here is a list of the supplies I used:
Sanding Sponge
Glidden Gripper Primer - Grey
Black Interior Paint (I used leftover black paint from the kitchen)
Minwax Polycrylic in Clear Satin
Small Roller
Small Brush

I started out by cleaning the floor and letting it dry completely then sanding all the tiles.  After sanding, I cleaned it again.  Next, I painted 2 coats of the Glidden Gripper Primer.

After 2 coats of Primer

I let the primer dry completely for a couple of days.  Then, I painted 2 coats of my black interior paint.

After 2 coats of black paint

I let the paint dry for 24 hours then applied 4 coats of Polycrylic.

After 4 coats of Polycrylic

I waited another 24 hours before walking on the floor.


Before, the floor was dull and boring and now it is super shiny and looks great.  I am not going to lie, the black floor shows every bit of dirt so I clean it pretty much every day.  But it is well worth the work.  I love it.

Have you ever painted anything that most people wouldn't?  I will paint anything.  I love that paint isn't that expensive and it makes such a difference.

I'll be back on Saturday with another project that I recently finished.

By the way, my office/craft room has been featured on Offbeat Home.  You can check it out here.  I am so grateful.


Tuesday, June 18, 2013

Tuesday Link Party #24

Welcome to If It's Not Baroque Tuesday link Party.  Don't you think my party needs a name.  I know a lot of bloggers that have link parties name them.  I think mine needs some pizzazz.  I would love it if you guys would give me your opinion.  I am open for suggestions.  So let me know.

In case you missed it, this is what I have been up to since the last party.

I went over my house painting debacle and showed how we plan to fix it.


I also showed off the Tiny Entry in our house.

Now let's party!


Some party rules:

*Please follow If It's Not Baroque via Google Friend Connect, Email, or Blog Lovin. 

*Please link to a specific post not just your blog
(Anything goes - home decor, recipes, crafts, etc. that were made by you)

*Link up as many projects as you want, old or new.  As long as you haven't linked it here before.

*Please do not link up giveaways, Etsy shops or other link parties.

*Please, please, please put a link back to my blog.  I am helping you get more exposure, please help me get some exposure. 
(use the button above or a text link)

*Please visit some of the other links 

Every week, I will pick a few of the links that I like the most and will feature them the day before the next party.

Monday, June 17, 2013

Link Party #23 Features

It is link party features time again.  My favorite day of the week.  The day that I can show off what all of you are working on.  Last week was yet another great link party.  I guess I have the outdoors on my mind because a lot of my favorites were outdoor related.

Here they are:    

yellow patio table
Yellow Patio Table by Something Is Done


Chevron Flag by Coley's Corner

Colorful coastal master bedroom makeover
Master Bedroom Reveal by Lilikoi Joy

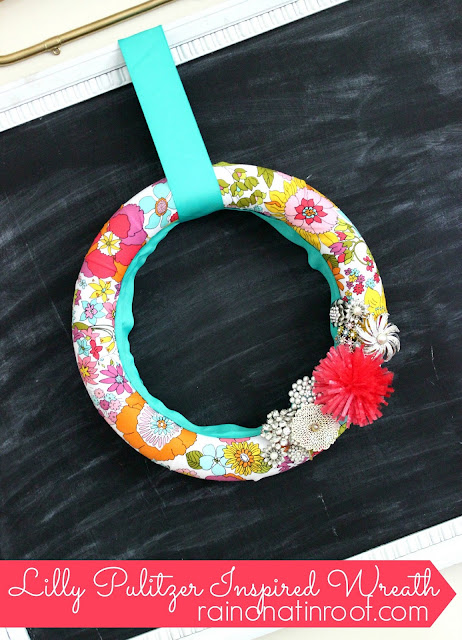
Lilly Pulitzer Inspired Wreath {rainonatinroof.com} #wreath #craft #lillypulitzer #floral #summer #lilly
Lilly Pulitzer Inspired Wreath by Rain on a Tin Roof

If you have been featured, please grab my button. (You can find the button code in the tab above).


I will be pinning the features on my Pinterest page as well.

Thank you to everyone who linked up.  I hope you will come back tomorrow for another link party.

Saturday, June 15, 2013

Welcome to the Fun House ~The Tiny Entry Reveal

While I was trying to figure out what to do about our siding debacle, I did manage to finish our tiny entry way.  I should mention that it is an extremely small area (maybe 3x3 feet) and there wasn't a lot of options for what I could do to that space.  But, I spruced it up the best that I could.

Here is what it looked like before:


And here it is now.


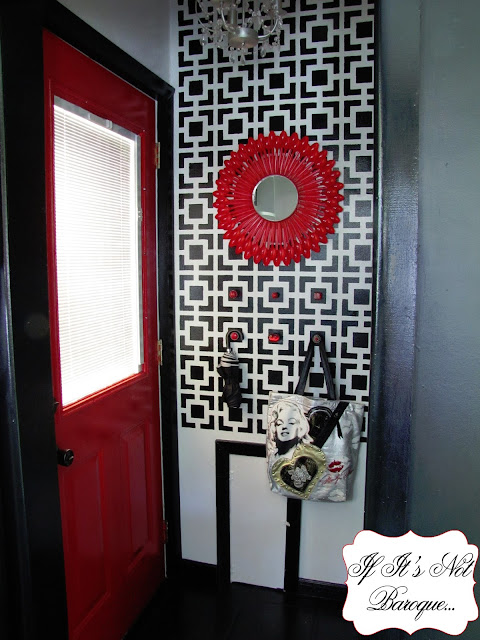
I painted the front door red, the walls and ceiling a bright white and all the trim gloss black.  I also stenciled one wall to add some impact.  I used the Hollywood Squares stencil by Royal Design Studio.


When you walk in the house from the outside, you are greeted with this photo booth poster.  I wanted visitors to immediately realize that our house is a fun place to be.  


I scanned a photo booth photo that we had taken at an amusement park a few years ago and had my mom (who works at a local photography studio) print this onto a sticky back poster (like a fat head).  It is stuck directly onto this door that leads to our basement.


Obviously, there isn't any room for furniture.  That meant that I had to be creative with what I could do to make this area function as an entry.  In the before shot, you can see that the previous owner had added several hooks onto the wall.  That was fine, but it wasn't very pretty.  I decided to use that concept, but jazz it up.  So, I went to Hobby Lobby and found 6 different knobs.  I painted 3 red and used my sharpie technique on the other 3.


Now guests can hang their coats on something a little bit more fun.  


I store an umbrella and my "work" bag in this space.


I decided to make the spoon sunburst mirror because the entry is right beside the kitchen.  I thought it would be appropriate to tie the two rooms together.  It was really easy to make.  I followed the tutorial by Blue Cedar Lane.  I love the pop of red against the black and white stencil wall.  


It was my husband's idea to add the Kristaller Chandelier from Ikea.  It has been sitting in our garage for months and I didn't really know what I was going to do with it.  There was no lighting in this area at all and it really made a difference.  Isn't my husband the best.  Well, I think so any ways.   


I painted the ceramic tile floor black and I will share how I did that in a future post.  I would have liked to add a small rug, but there just isn't any clearance under the door.  Believe me, I tried.

Well, that is it.  Not much to see.  But it does make a difference in our house.  Because it is the first thing people see when they come in our house, it was really important to cross that off the list.

So what do you think?  Just another crazy room in the fun house.  If you like this room, you should check out the rest of my crazy house.  Chevron Kitchen, Baroque Mudroom, and the Music Inspired Home Office.    


Have a nice weekend.  I'll be back on Monday.

Thursday, June 13, 2013

House Painting Debacle

Today, I planned on showing the progress we have made on painting our house.  Instead, I am going to tell you about the debacle that painting the house has turned into.

Let me remind you what our house looked like a couple of years ago.


In the past couple of years, we have removed most of the awnings that were completely disgusting.  We removed hedges and old landscaping that was overgrown.  All of this was done in preparation for painting the house this year to start the process of updating the exterior of our house.  Needless to say, we were extremely excited to get the ball rolling.

We picked out a medium gray color that we liked (Almost Charcoal from Lowe's).  We wanted to start out on a small section of our house to make sure it was the right color.


I started with this small section on the back of our house.  I painted 2 coats of the gray on the vinyl siding, 2 coats of white on the gutter and corner piece and 2 coats of black on the foundation.  We were pretty pleased with it.  It was a huge difference from the stained white that it was before.  So we decided to proceed.


I painted all three sides of this small section of our house (the dog's room) and thought it was finally starting to look like a decent house.  We bought a 5 gallon bucket of paint to tackle the largest parts of the house.

We were so excited to paint the front of our house because it is the most visible part of the house.  As you can see in the before shot, the front was in bad shape.  The siding was moldy and stained and the awnings were hideous.  It was going to be such a relief to improve it.


The above photo is after the first coat of paint.  Something strange started to happen at that point.  The siding was starting to warp.  My worst fear was turning into reality.  It doesn't look that bad in this photo.  Let's take a closer look.


As you can see, the warping was all over.  It looks horrible.  If you look back at the other sides of the house there was some warping as well, but not as bad or as noticeable as the front of the house.  We aborted painting at that point.

After some research, I discovered that you can paint vinyl siding ONLY if the paint color is the same color or a lighter color.  Repeatedly, I found this information "DO NOT paint vinyl siding a darker color".  Well, that was a complete bummer.  We had no idea that only darker paint colors would have this effect on our siding.

We were completely devastated.  Painting our house was going to cost less than $200 for the whole house and detached garage.  Now, we are looking at way more money to fix this mess.

After thinking about what to do for several days, we have decided that replacing the siding is our only option.  We don't want to live another couple of years with deformed siding.  The silver lining in this debacle is that we are going to get what we ultimately wanted.

Here is a rendering of what we are planning on doing.


We are going to focus on the front of the house this summer.  It will be done in phases.  We are going to start with adding the deck that we wanted to add for a long long time.  The second phase will be replacing the vinyl siding with LP Smart Side Panel Siding (an engineered wood) which is a vertical siding (what I always wanted).  We will still paint it the medium gray that we bought a 5 gallon bucket of.  The third phase will be adding the pergola over the deck area to add some shade.

I am not sure when we will begin this process, but I will keep you updated.  So what do you think?  Have you ever failed so miserably on a project that it ended up costing you way more money?

Before I go, I want to announce that the winner of the paperback copy of Living in a Nutshell is:

Ingrid@nowathomemom who commented:
WOW! the spaces you showed us are beautiful and unique! :-) I love them! I will go and visit her blog! thank you for introducing Janet to us! :-) & how nice of her to send you a book for your followers! :-)

Congratulations, Ingrid.  I will be in touch.


Tuesday, June 11, 2013

Tuesday Link Party #23

I am so glad you are here at If It's Not Baroque Tuesday Link Party.  I hope you have fun linking up your projects and gathering inspiration.

In case you missed it, this is what I have been up to since the last party.

I review the book Living in a Nutshell and a Giveaway


Some party rules:

*Please follow If It's Not Baroque via Google Friend Connect
(if not on blogger follow through email, Blog Lovin or Linky Followers)

*Please link to a specific post not just your blog
(Must be home decor related - DIY projects, room transformations, and any other home related decorating)

*Link up as many projects as you want, old or new.  As long as you haven't linked it here before.

*Please do not link up giveaways, Etsy shops or other link parties.

*Please, please, please put a link back to my blog.  I am helping you get more exposure, please help me get some exposure. 
(use the button above or a text link)

*Please visit some of the other links 

Every week, I will pick a few of the links that I like the most and will feature them the day before the next party.